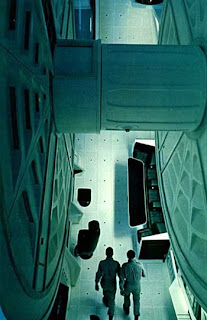
I found this image below of a screenshot of the gravity ferris in 2001: a space odyssey on the internet. I wanted to use this image as reference for textures and lighting within my renders using lightwave. At this point I had succeeded in improving the appearance of the robotic arms, the crane and the vehicle which I was particularly proud of. These were probably the components that turned out to be the best models I had created during this project.
The render below came out particularly well and was my favourite out of all the other renders just because of the mood that is conveyed by very little lighting.It was the closest render that resembled the image above and my original concepts. I attempted to render off additional lighting by adding the red glow of the crane light and the soft ambient light of the strip lights, however for some reason it was taking for ever to render, literally it would have taken half a week. I was concerned that I was going to run out of time. I was determined to produce a render that did my original concepts justice. So I decided to introduce this lighting by using photoshop over the top of my renders. As you can see the first three renders have no additional lighting. The second and third image below shows the renders where I attempted to introduce a little more light and reflection. These images of course took a lot longer to render simply because Lightwave had to calculate how the light would reflect and bounce around the interior. With these additional renders with reflection I wanted to give a sense that the surfaces were somewhat reflective and clean. I also introduced more lighting so there was more of a contrast between light and shadow in order to portray the space and exaggerate the relief of the indentations on the walls and door.
 The render below came out particularly well and was my favourite out of all the other renders just because of the mood that is conveyed by very little lighting.It was the closest render that resembled the image above and my original concepts. I attempted to render off additional lighting by adding the red glow of the crane light and the soft ambient light of the strip lights, however for some reason it was taking for ever to render, literally it would have taken half a week. I was concerned that I was going to run out of time. I was determined to produce a render that did my original concepts justice. So I decided to introduce this lighting by using photoshop over the top of my renders. As you can see the first three renders have no additional lighting. The second and third image below shows the renders where I attempted to introduce a little more light and reflection. These images of course took a lot longer to render simply because Lightwave had to calculate how the light would reflect and bounce around the interior. With these additional renders with reflection I wanted to give a sense that the surfaces were somewhat reflective and clean. I also introduced more lighting so there was more of a contrast between light and shadow in order to portray the space and exaggerate the relief of the indentations on the walls and door.

 Below are the renders that are shown above, only here I have added additional lighting over the top of these images. I used photoshop to add the additional, crucial lighting that I believed would make the images that much better and true to my original concepts. As you can see although the photoshop lighting is not a true lighting render, I think I did a good job of making the reflections and glows look like they belonged to the renders themselves. The additional lighting allowed me to express that the surfaces such as the walls and floor are meant to be somewhat reflective. Notice that I also added the hazard stripes texture on to the crane beam as I has forgot to apply the texture before these renders.


No comments:
Post a Comment